【note】celery基本使用

Celery 是一个异步的分布式任务队列,主要用于实时处理和任务调度。不过它的消息中间件是默认选择使用 rabbitmq。
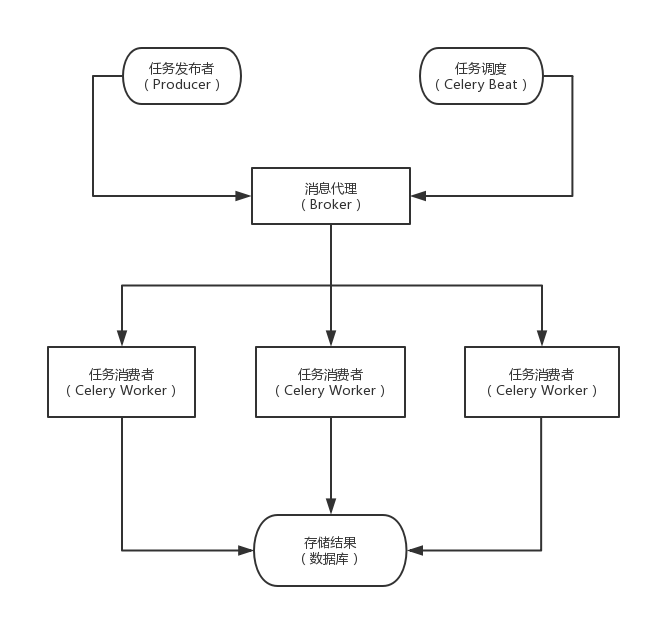
Celery 包含的组件:

  1. Celery Beat: 任务调度器,用来调度周期任务。
  2. Producer: 任务生产者,调用 Celery 产生任务。
  3. Broker: 消息中间件,任务消息存进队列,再按序发送给消费者。
  4. Celery Worker: 执行任务的消费者,通常可以进行在多台服务器上运行多个消费者。
  5. Result Backend: 任务处理完成之后保存状态信息和结果,一般是数据库。

Celery 产生任务的方式有两种

  1. 发布者发布任务
  2. 任务调度按时发布定时任务

Celery 的架构

样例

  • Requirement
    • Python 2.7.12
    • pymongo>=3.5.1
    • celery[msgpack]>=4.1.0

文件配置和常见结构一致,相关配置均在celeryconfig,py文件中,处理的任务中有一个定时调度任务feeddog, worker任务eat, feeddog任务中调度eat任务去执行,feeddog可以作为中心节点管理,而eat任务可以作为分布式节点去执行。celeryconfig中单独配置了eat任务的存储后端。

  • app.py
1
2
3
4
5
6
7
8
9
10
11
from __future__ import absolute_import

from celery import Celery


app = Celery('proj', include=['proj.tasks'])
app.config_from_object('eyes.celeryconfig')


if __name__ == '__main__':
app.start()
  • tasks.py
1
2
3
4
5
6
7
8
9
10
11
12
13
14
15
16
17
18
19
20
21
22
23
24
from __future__ import absolute_import

from celery import group

from .app import app
from .scan.scans import nmap_scan


@app.task
def eat(a, b):
return sum(a,b)

@app.task
def feeddog():
nums = ((1, 3), (2,4), (4, 8))
for a,b in nums:
eat.delay(a, b)

# or
@app.task
def feeddog():
nums = ((1, 3), (2,4), (4, 8))
dog_groups = ([eat.s(a, b) for a, b in nums])
dog_groups.delay()
  • celeryconfig
1
2
3
4
5
6
7
8
9
10
11
12
13
14
15
16
17
18
19
20
21
22
23
24
25
26
27
28
29
30
31
32
33
34
35
36
37
38
39
40
41
42
43
44
45
46
47
48
49
50
51
52
53
54
55
56
57
58
59
60
61
62
63
64
65
66
67
68
69
70
71
72
73
74
75
76
77
78
79
80
81
82
#!/usr/bin/env python
# -*- coding: utf-8 -*-

"""
celery config, Ref:
http://docs.celeryproject.org/en/master/userguide/configuration.html
"""

from datetime import timedelta

from kombu import Queue
from kombu import Exchange
from celery.backends.mongodb import MongoBackend

from .app import app


# broker
broker_url = 'pyamqp://guest@localhost:5672//'

# result
# http://docs.celeryproject.org/en/master/_modules/celery/backends/mongodb.html
mongodb_url = 'mongodb://localhost/celery'
result_backend = mongodb_url
# mongodb_backend_settings = {
# 'database': 'proj', # databse name
# 'taskmeta_collection': 'celery' # collection name
# }
# special task backend setting collection
eat_backend = MongoBackend(app, url=mongodb_url)
eat_backend.taskmeta_collection = 'celery_eat'

# time of keeping result
result_expires = 60 * 60 * 24

# serializer, compare to json, msgpacker is smaller and better performance
# task_serializer = 'msgpack'
# result_serializer = 'msgpack'
# accept_content = ['msgpack']

timezone = 'Asia/Shanghai'
enable_utc = True

# task attribute setting
# http://docs.celeryproject.org/en/latest/userguide/tasks.html
task_annotations = {
# task : args
'proj.tasks.eat': {
'rate_limit': '50/s',
'backend': eat_backend
},
'proj.tasks.feeddog': {
'ignore_result': True
}
}

task_queues = (
Queue('feed', exchange=Exchange('feed'),
routing_key='feed.#'),
Queue('eat', exchange=Exchange('eat'),
routing_key='eat.#')
)

# routing
# http://docs.celeryproject.org/en/latest/userguide/routing.html
task_routes = {
'proj.tasks.feeddog': {'queue': 'feed'},
'proj.tasks.eat': {'queue': 'eat'}
}

# beat schedule
# http://docs.celeryproject.org/en/master/userguide/periodic-tasks.html#beat-entries
beat_schedule = {
'do-nmap-scan-60-seconds': { # scheduler task name
'task': 'proj.tasks.feeddog', # special task name with project name
'schedule': timedelta(seconds=60),
#'args': ()
'options': {
'queue': 'feed_scan' # task to specific queue
}
}
}

Run:

1
2
3
4
5
6
# 分布式端点
celery worker -A eyes.app -l info -Q feed
# 中心
celery worker -A eyes.app -l info -Q eat
# 中心
celery beat -A eyes.app -l info

在上面的自动调度方案中,是通过在配置文件中设置调度的相关参数,除了这种方式外还可以在代码里面设置,这种方式控制的粒度更为精细

1
2
3
4
5
6
7
8
# @app.on_after_configure.connect not work
@app.on_after_finalize.connect
def setup_periodic_tasks(sender, **kwargs):
sender.add_periodic_task(
60,
feeddog.s(),
name='feed-dog-every-60-seconds'
)

工作流(canvas)

子任务:也可以视为一种任务,但如果把任务视为函数的话,它可能是填了部分参数的函数。子任务的主要价值在于它可以用于关联运算中,即几个子任务按某种工作流方式的定义执行更为复杂的任务。

Celery工作流包含以下原语:

  1. group

group并行的执行一系列任务:

1
2
3
4
5
from celery import group
from proj.tasks import add

group(add.s(i, i) for i in xrange(10))().get()
# [0, 2, 4, 6, 8, 10, 12, 14, 16, 18]
  1. chain

chain串行的执行任务:

1
2
3
4
5
from celery import chain
from proj.tasks import add, mul

chain(add.s(4, 4) | mul.s(8))().get()
# (4 + 4) * 8
  1. chord

chord是包含回调的group操作

  1. map
  2. starmap
  3. chunks

backend 使用rabbitmq

Celery 4.0以后backend使用rabbitmq推荐使用rpc, RPC Result Backend有如下特点:

  1. 默认不持久化, 可以通过配置 result_persistent来配置持久化
  2. 优势在于可以实时的获取状态变化,而不用客户端去轮询的获取
  3. 缺点: 只能被检索一次,如果您有两个进程等待相同的结果,其中一个进程将永远不会收到结果

worker 后台运行

celery multi命令在后台启动一个或多个worker。

1
2
3
4
5
6
celery multi start w1 -A proj -l info
celery multi start w1 -A proj -l info --pidfile=/var/run/celery/%n.pid \
--logfile=/var/log/celery/%n%I.log
celery multi restart w1 -A proj -l info
celery multi stop w1 -A proj -l info
celery multi stopwait w1 -A proj -l info

supervidor

  • celery.ini
1
2
3
4
5
6
7
8
9
10
11
12
13
14
15
16
17
18
19
20
21
22
23
24
25
26
27
28
29
30
31
32
33
34
35
36
37
38
39
40
41
42
43
44
45
46
47
48
49
50
[group:test_celery]
programs = test_celery.async,test_celery.beat

[program:test_celery.async]
command=/data/test.celery/env/bin/celery worker -A proj.app --loglevel=info -Q test_celery_queue
numprocs=1
numprocs_start=0
priority=999
autostart=true
startsecs=3
startretries=3
exitcodes=0,2
stopsignal=QUIT
stopwaitsecs=60
directory=/data/test.celery
user=www-data
stopasgroup=false
killasgroup=false
redirect_stderr=true
stdout_logfile=/data/log/test.celery/test_celery.log
stdout_logfile_maxbytes=250MB
stdout_logfile_backups=10
stderr_logfile=/data/log/test.celery/test_celery.err
stderr_logfile_maxbytes=250MB
stderr_logfile_backups=10
environment=PYTHONPATH='/data/test.celery/';C_FORCE_ROOT="true"

[program:test_celery.beat]
command=/data/test.celery/env/bin/celery beat -A proj.app --loglevel=info
numprocs=1
numprocs_start=0
priority=999
autostart=true
startsecs=3
startretries=3
exitcodes=0,2
stopsignal=QUIT
stopwaitsecs=60
directory=/data/test.celery
user=www-data
stopasgroup=false
killasgroup=false
redirect_stderr=true
stdout_logfile=/data/log/test.celery/test_celery.beat.log
stdout_logfile_maxbytes=250MB
stdout_logfile_backups=10
stderr_logfile=/data/log/test.celery/test_celery.beat.err
stderr_logfile_maxbytes=250MB
stderr_logfile_backups=10
environment=PYTHONPATH='/data/test.celery/';C_FORCE_ROOT="true"

简单说明

  • test_celery.asynctest_celery.beat 是两个program,分别对应worker和beat,而它们又同属于 test_celery 这个组,这样便于同时管理。
  • environment 下设置 PYTHONPATH

Ref

  1. http://blog.csdn.net/libing_thinking/article/details/78566208